Showing posts with label DIY. Show all posts

Thursday, October 25, 2012

Easy DIY Halloween Costume Dinosaur

So I wanted to make a costume for the mini and thought a dinosaur would be adorable. So I went out to Target got myself a plain circo hoodie for $8. I chose dark blue for the hoodie, and went over to JoAnns for some turquoise felt. The felt was 25 cents a sheet and I bought 2 sheets which was plenty.

So this costume cost me $8.50 and turned out fantastically cute. I couldnt be happier. Here's how I did it. Folded the felt sheets in half and cut out triangle pieces in varying sizes.

 I chose bigger to smaller. Then folded the sweater in half and layed out my pattern, so I knew where to pin the traingles (diamonds.)


Then I pinned down the triangles, and just sewed them down, open, in the middle of the sweater on one side of the seam.

Make sure that you sew all of your pieces on the same side of the seam, I didnt and one had kept falling over so I had to hand sew it down. So, learn from my mistake.

Then I  folded the triangles and sewed the pieces shut.

 Voila! Then have a pant-less photoshoot outside because its 80 degrees a week before Halloween. Ridiculous, but super cute!


This was really easy, and took me maybe an hour from start to finish. Perfect for a last minute costume!!!  But it was really simple and not complicated at all. A beginning sewer could definitely do this. Let me know if you have any questions!!
xoxo, Janean Pin It

Wednesday, October 24, 2012

Iron On T-Shirt Vinyl

In the past I have used my Silhouette to make stencils with freezer paper so I could use fabric paint or bleach on clothes for the boys. I still love doing that, but recently I have started drawing images in Photoshop and then using iron on vinyl! Hello! Genius! WHY have I NOT done this BEFORE???? Way easier! And I love the way it turns out, and anyone, I mean anyone, can do it. Just open photoshop and draw your image, or I imagine you could scan in an image your child has drawn.


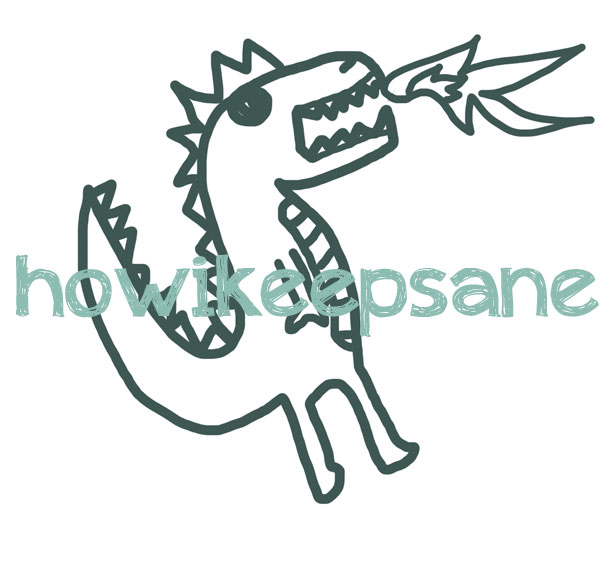
Which would be super awesome and they would looove it! Next save the image as a jpeg, open it in your silhouette program. Then flip the image horizontally, it has to be backwards when it cuts out but then when you place it,. its forwards, and the right way. Make sense? And then use the TRACE feature, its in the top right. I circled it here. Select you image by drawing a square around it, kinda like cropping. It will choose the lines of your images that will be cut out. When you are drawing, try to make all your lines connect so that you will only have to peel out one image, and not a ton of little ones. Refer to my image to see what I mean. There are no separate images, the fire and the hand are both attached to the main dragon image.


And then you are ready to cut. Send your image to the silhouette and make sure to select the correct settings. Iron on vinyl is simple, its just like regular vinyl, it peels off the backing. Except you cut ON the vinyl, not the back plastic part.
And you iron it on! I picked up a few shirts from H&M, they are only $5 and honestly I think the quality is far better than Targets $5 shirts. I used black vinyl and white flocked to make matching shirts for the big bro and the mini.
 I really like the black smooth vinyl. I really wanted these images to keep the hand drawn effect, and I think that this accomplishes it best.
 An example of what the vinyl looks like once the image is peeled off.


 Then go crazy with your drawings and iron ons!!


The skys the limit!! Cant wait to show the boys they will be so excited! The great thing about this is that you only have to draw the image once and then store it on your computer and you can use it over and over!


Hope I inspired you to be creative especially with Halloween right around the corner!
xoxo, Janean

And Ps going to The Voice was fantastic! I am sworn to secrecy so I cant say anything about it, except if you get the chance, then go! It was so much fun and I really enjoyed all 15hrs of our day, only 5.5 of which were taping. Maybe you will see me on tv next spring?? I will let you know...
xo

Pin It

Friday, October 5, 2012

Easy DIY Bat Garland for Halloween

As I was preparing for Halloween I had this crazy idea to make a bat garland, from a plastic table cloth. Dare I say a batty idea? I dare. So I traveled down to the Dollar Tree and picked up a black plastic tablecloth. I almost bought 2 just for good measure but glad I decided against it. I wouldn't have used it. I def had enough material.


I decided to fold the table cloth the way you do when you make a people chain. It's the same folding method for making a paper fan. I chose this way because most garlands want you to cut out like 100 bats. This way I only have to cut one! No brainer! If you don't know how to do that, or what I mean. Please ask and I'll clarify.


Next I needed a template. I took a piece of packaging cardboard that came with the giant spider I just bought. It was the right stiffness, but bonus, it had a simple image of a bat on it. I just used that image as a reference for my own and drew one on the back.


Then I cut the bat out and used it as a template and placed it on top of my folded tablecloth. I cut out everywhere except on the folds. Don't cut the bat out all the way. He needs to be able to attach to the next bat, and they will be attached at the folds.


In some places the bat might be attached to another spot like on the wing, below. This is just because there are soo many layers to cut throughout and you may not cut through every one. If this is the case, then just snip where you need to.


Then I pulled it open. Voila. ( cue angelic chorus) This was perfect, and with just one cut we had over 30 ft of garland. Then hang away. I chose over windows and in doorways.


Hope this inspired you to make some fun and easy Halloween decorations. The kids love it!!
Posted with Blogsyxoxo, Janean
Pin It

Thursday, October 20, 2011

Witch Costume Adult Tutu Tutorial


First, lets clarify, this isn't an "Adult" costume. This is just a costume an adult could wear. I made this tutu for my Halloween costume and Im going to share how.
Pin It

Saturday, August 13, 2011

Bleach Pen Art Tutorial


This project was pretty simple. Cheap to say the least.
"Bleach Art", "Reverse Dying", whatever you want to call it,
is all the rage right now.
Pin It
Related Posts Plugin for WordPress, Blogger...
Set Your Price. Choose your Advertisers. Sign up for SocialSpark!